Stock Price Prediction
Yuvraj Tiwary
This project demonstrates how machine learning models can be used to predict stock prices based on historical data, helping investors make informed decisions.
The script imports a dataset containing stock prices, and then cleans the data by removing unnecessary columns.
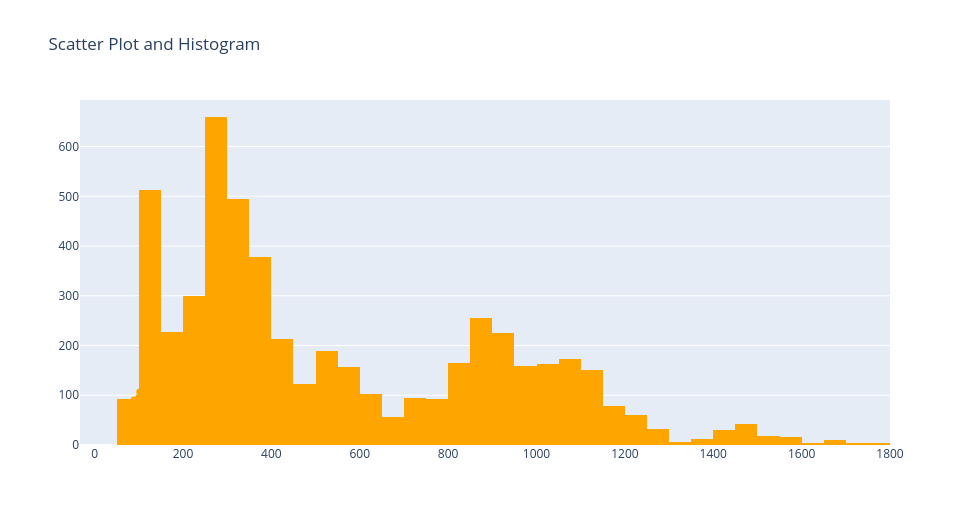
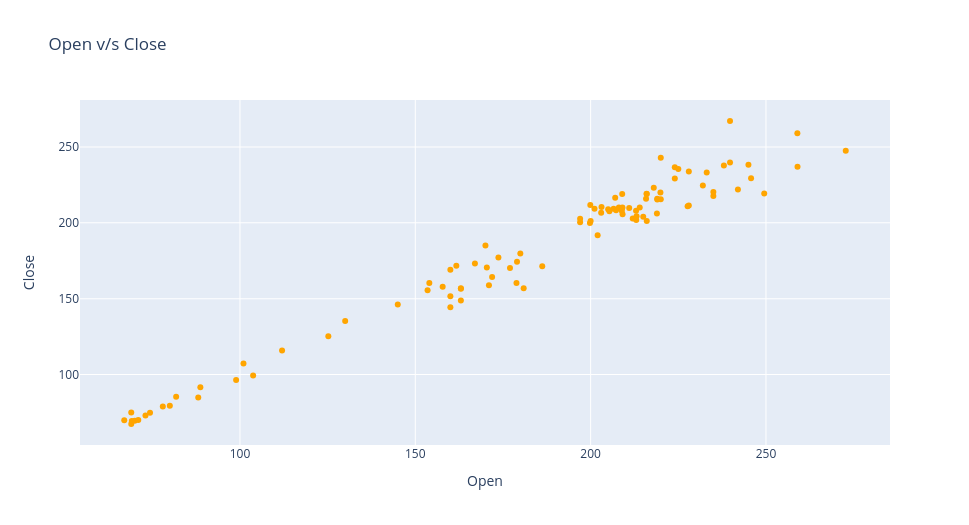
It visualizes the data using scatter plots and histograms to understand the distribution and relationships between variables.
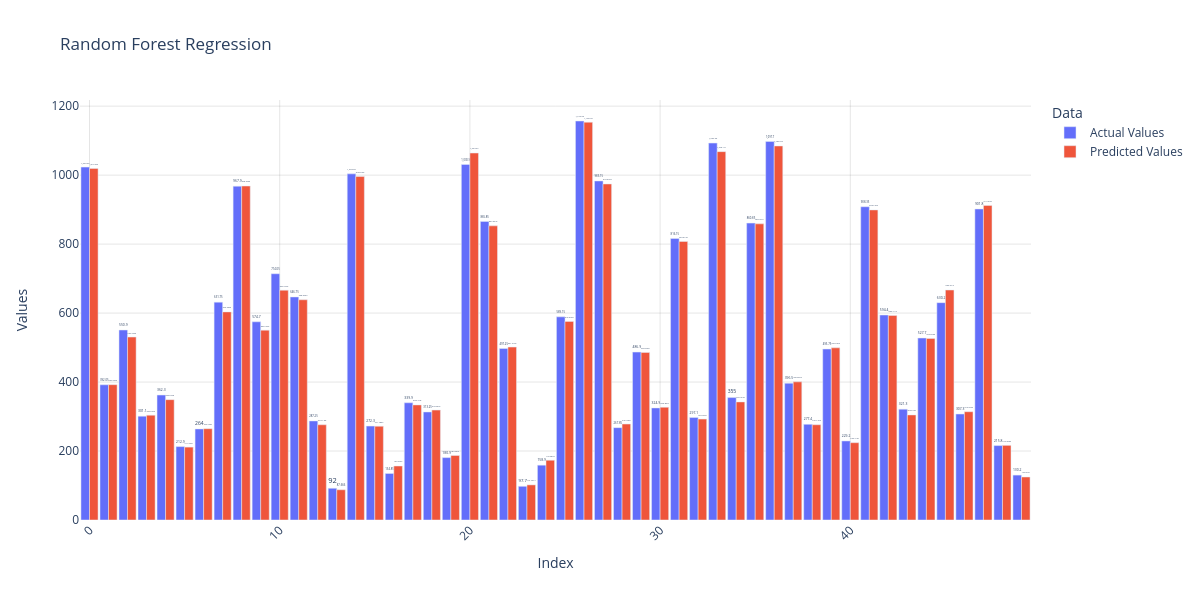
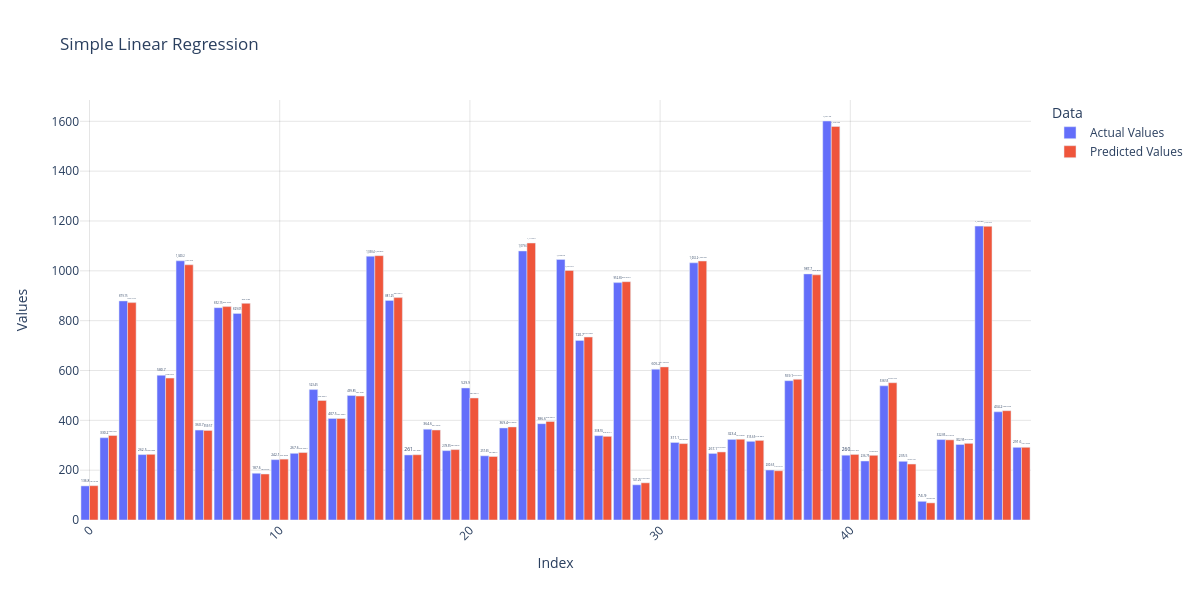
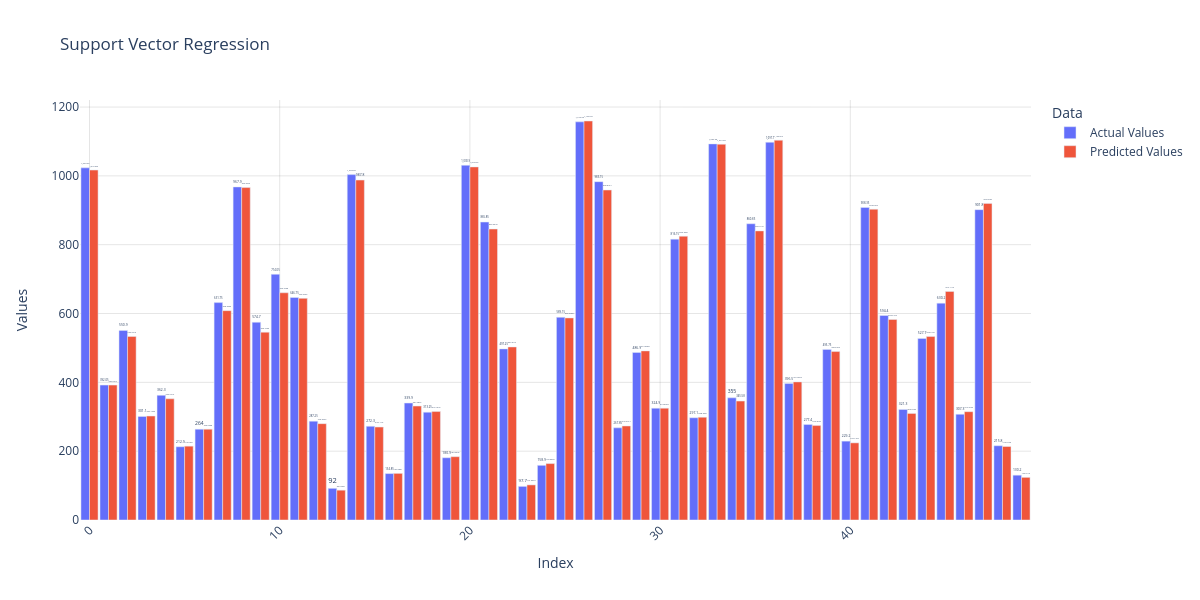
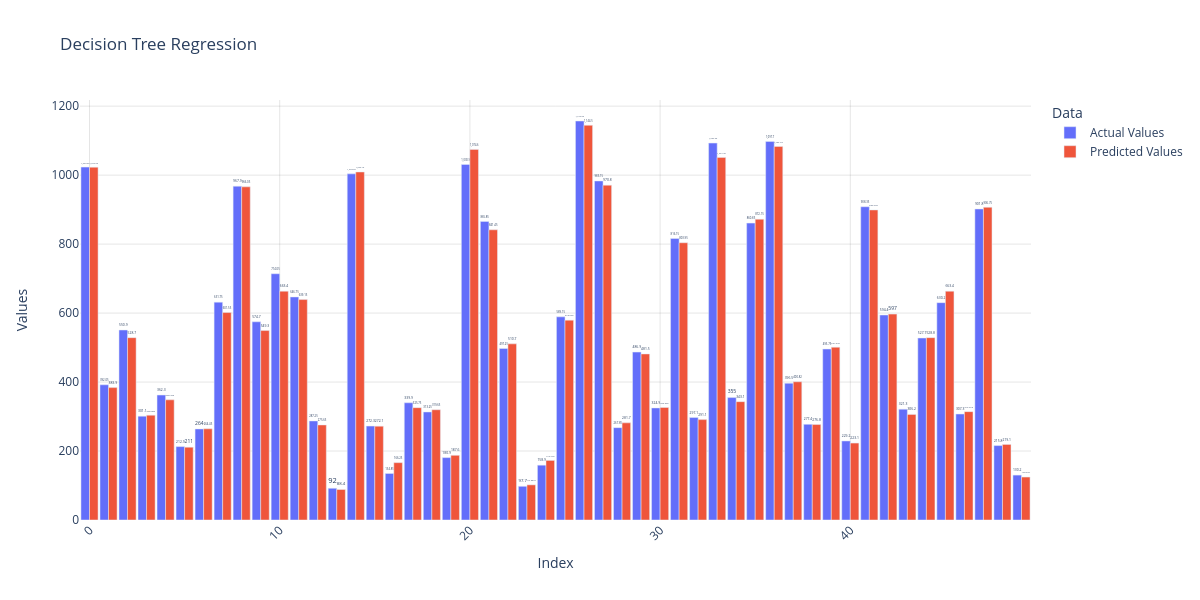
It builds four different regression models: Simple Linear Regression, Support Vector Regression, Decision Tree Regression, and Random Forest Regression.
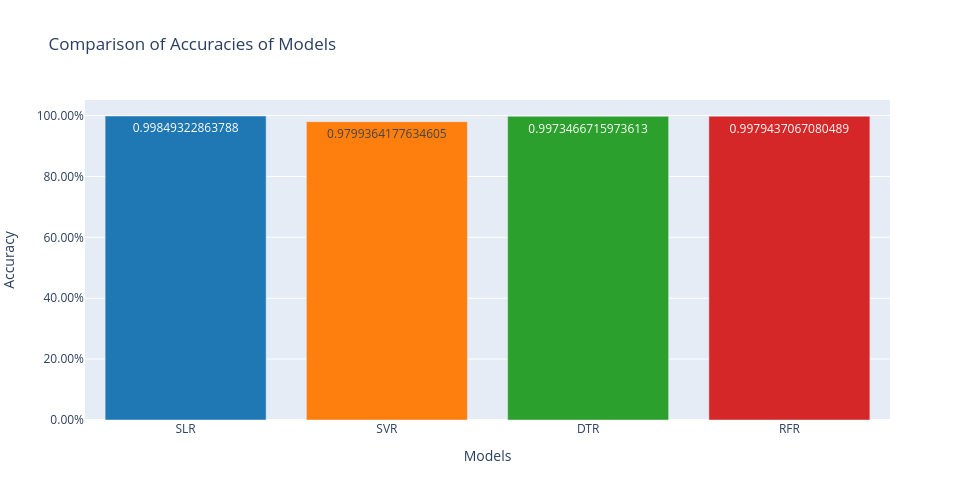
Each model is evaluated using the R-squared score to measure its accuracy in predicting stock prices.
The script visualizes the accuracies of the four models using a bar chart, making it easy to compare their performance.
Finally, the script predicts the closing price of a stock for a specific date using the model with the highest accuracy.
The script imports a dataset containing stock prices, and then cleans the data by removing unnecessary columns.
import numpy as np
import pandas as pd
import matplotlib.pyplot as plt
import seaborn as sns
from sklearn.model_selection import train_test_split
from sklearn.metrics import r2_score
import warnings
warnings.filterwarnings('ignore')
sns.set_style('darkgrid')
dataset = pd.read_csv('ICICI_BANK.csv')
dataset.shape
(5306, 15)
from IPython.display import display, HTML
# Generate HTML code for the table
table_html = """
<div style="background-color: #f9f9f9; padding: 10px; border-radius: 5px;">
<h3>Dataset Columns</h3>
<table>
<tr>
<th>Column Name</th>
</tr>
"""
for column in dataset.columns:
table_html += f"""
<tr>
<td>{column}</td>
</tr>
"""
table_html += """
</table>
</div>
"""
# Display the HTML table
display(HTML(table_html))
Column Name |
---|
Date |
Symbol |
Series |
Prev Close |
Open |
High |
Low |
Last |
Close |
VWAP |
Volume |
Turnover |
Trades |
Deliverable Volume |
%Deliverble |
from IPython.display import display, HTML
# Generate HTML code for the table
table_html = """
<div style="background-color: #f9f9f9; padding: 10px; border-radius: 5px;">
<h3>Dataset Info</h3>
<table>
<tr>
<th>Column Name</th>
<th>Non-Null Count</th>
<th>Dtype</th>
</tr>
"""
for column in dataset.columns:
non_null_count = dataset[column].count()
dtype = dataset[column].dtype
table_html += f"""
<tr>
<td>{column}</td>
<td>{non_null_count}</td>
<td>{dtype}</td>
</tr>
"""
table_html += """
</table>
</div>
"""
# Display the HTML table
display(HTML(table_html))
Column Name | Non-Null Count | Dtype |
---|---|---|
Date | 5306 | object |
Symbol | 5306 | object |
Series | 5306 | object |
Prev Close | 5306 | float64 |
Open | 5306 | float64 |
High | 5306 | float64 |
Low | 5306 | float64 |
Last | 5306 | float64 |
Close | 5306 | float64 |
VWAP | 5306 | float64 |
Volume | 5306 | int64 |
Turnover | 5306 | float64 |
Trades | 2456 | float64 |
Deliverable Volume | 4789 | float64 |
%Deliverble | 4789 | float64 |
from IPython.display import display, HTML
# Get the describe() output
desc = dataset.describe()
# Convert the describe() output to an HTML table
table_html = "<table>"
table_html += "<tr><th></th>"
for column in desc.columns:
table_html += f"<th>{column}</th>"
table_html += "</tr>"
for index, row in desc.iterrows():
table_html += "<tr>"
table_html += f"<td>{index}</td>"
for value in row:
table_html += f"<td>{value:.2f}</td>"
table_html += "</tr>"
table_html += "</table>"
# Display the HTML table
display(HTML(table_html))
Prev Close | Open | High | Low | Last | Close | VWAP | Volume | Turnover | Trades | Deliverable Volume | %Deliverble | |
---|---|---|---|---|---|---|---|---|---|---|---|---|
count | 5306.00 | 5306.00 | 5306.00 | 5306.00 | 5306.00 | 5306.00 | 5306.00 | 5306.00 | 5306.00 | 2456.00 | 4789.00 | 4789.00 |
mean | 550.90 | 551.56 | 560.56 | 541.53 | 551.05 | 551.00 | 551.13 | 8224630.71 | 375929920576296.62 | 138367.63 | 4183406.04 | 0.47 |
std | 368.78 | 368.89 | 374.08 | 363.39 | 368.71 | 368.73 | 368.75 | 12185349.04 | 475813345498016.69 | 99008.73 | 6365381.73 | 0.13 |
min | 67.40 | 67.00 | 70.45 | 66.00 | 67.00 | 67.40 | 68.52 | 7409.00 | 96172830000.00 | 2595.00 | 15015.00 | 0.10 |
25% | 267.56 | 267.40 | 271.91 | 263.62 | 267.40 | 267.61 | 267.58 | 961205.50 | 34594425000000.00 | 79312.25 | 699502.00 | 0.38 |
50% | 398.08 | 399.00 | 406.52 | 392.45 | 398.70 | 398.18 | 398.24 | 3486647.50 | 292301000000000.00 | 110101.00 | 1963117.00 | 0.48 |
75% | 873.56 | 877.00 | 888.77 | 859.80 | 874.60 | 873.56 | 873.51 | 11572021.25 | 499352750000000.00 | 162953.50 | 5948817.00 | 0.56 |
max | 1794.10 | 1767.05 | 1798.15 | 1760.15 | 1793.00 | 1794.10 | 1783.46 | 286857658.00 | 14600000000000000.00 | 949891.00 | 232530747.00 | 0.98 |
# we can visualize, Before cleaning
# display(dataset.head().style.hide_index())
# Delete unnecessary columns
# dataset.drop(["Symbol", "Series", "Prev Close", "High", "Low", "Last", "VWAP", "Volume", "Turnover", "Trades", "Deliverable Volume", "%Deliverble"],
# axis = 1, inplace = True)
dataset.drop(columns=dataset.columns.difference(['Date', 'Open', 'Close']), inplace=True)
# we can visualize, Before cleaning
# display(dataset.head().style.hide_index())
It visualizes the data using scatter plots and histograms to understand the distribution and relationships between variables.
import plotly.express as px
fig = px.scatter(dataset.head(100), x="Open", y="Close", title="Open v/s Close", color_discrete_sequence=['orange'])
fig.show()
import plotly.graph_objects as go
# Create scatter plot
fig1 = px.scatter(dataset.head(100), x="Open", y="Close", title="Open v/s Close", color_discrete_sequence=['orange'])
# Create histogram
fig2 = px.histogram(dataset, x="Close", nbins=50, title="Histogram of Close Prices", color_discrete_sequence=['orange'])
# Create subplots
fig = go.Figure()
fig.add_trace(fig1['data'][0])
fig.add_trace(fig2['data'][0])
# Update layout
fig.update_layout(title="Scatter Plot and Histogram", showlegend=False)
# Show the figure
fig.show()
from sklearn.linear_model import LinearRegression
from sklearn.svm import SVR
from sklearn.tree import DecisionTreeRegressor
from sklearn.ensemble import RandomForestRegressor
It builds four different regression models: Simple Linear Regression, Support Vector Regression, Decision Tree Regression, and Random Forest Regression.
X = dataset['Open'].values
y = dataset['Close'].values
X_train, X_test, y_train, y_test = train_test_split(X, y, train_size=0.7, test_size=0.3)
model1 = LinearRegression()
build1 = model1.fit(X_train.reshape(-1, 1), y_train)
predict1 = model1.predict(X_test.reshape(-1, 1))
print("Co-efficient: ", model1.coef_)
print("\nIntercept: ", model1.intercept_)
Co-efficient: [0.99860402] Intercept: 0.24768269983928803
from IPython.display import HTML
html_table = df1.head(10).to_html(index=False, justify='center', classes='table table-striped table-hover table-bordered')
styled_table = f'<div style="text-align: center;"><style>table {{border-collapse: collapse; width: 50%;}} th, td {{border: 1px solid #dddddd; text-align: left; padding: 8px;}} th {{background-color: #f2f2f2;}}</style>{html_table}</div>'
display(HTML(styled_table))
Actual Values | Predicted Values |
---|---|
136.80 | 137.635962 |
330.20 | 339.076123 |
879.15 | 872.417691 |
262.50 | 263.598544 |
580.70 | 569.507672 |
1040.20 | 1024.272582 |
360.70 | 359.570035 |
852.15 | 856.422442 |
829.05 | 869.418582 |
187.60 | 184.622005 |
import plotly.express as px
import plotly.io as pio
# Create the bar plot
fig = px.bar(df1.head(50), title='Simple Linear Regression', barmode='group', color_discrete_sequence=px.colors.qualitative.Plotly)
# Customize the layout
fig.update_layout(
xaxis_title='Index',
yaxis_title='Values',
legend_title='Data',
width=1200,
height=600,
xaxis_tickangle=-45, # Rotate x-axis labels for better readability
showlegend=True, # Show legend
font=dict(size=12), # Set font size
plot_bgcolor='rgba(0,0,0,0)', # Set plot background color
paper_bgcolor='rgba(0,0,0,0)', # Set paper background color
bargap=0.1, # Set gap between bars
xaxis=dict(showgrid=True, gridcolor='rgba(0,0,0,0.1)'), # Show x-axis gridlines
yaxis=dict(showgrid=True, gridcolor='rgba(0,0,0,0.1)') # Show y-axis gridlines
)
# Add data labels to the bars
fig.update_traces(texttemplate='%{y}', textposition='outside')
# Display the plot
fig.show()
# Save the plot as a PNG file
# pio.write_image(fig, 'bar_plot.png')
accuracy1 = r2_score(y_test, predict1)
print("Accuracy of Simple Linear Regression:", accuracy1)
Accuracy of Simple Linear Regression: 0.99849322863788
model2 = SVR(kernel="rbf", gamma = 0.01, C=100)
build2 = model2.fit(X_train.reshape(-1, 1), y_train)
predict2 = model2.predict(X_test.reshape(-1, 1))
df2 = pd.DataFrame(list(zip(y_test, predict2)), columns=["Actual Values", "Predicted Values"])
import pandas as pd
# Assuming df2 is your DataFrame
data = {'Actual Values': df2['Actual Values'], 'Predicted Values': df2['Predicted Values']}
df_table = pd.DataFrame(data)
styled_df_table = df_table.head(10).style.set_table_styles([
{'selector': 'th.row_heading', 'props': 'display: none;'}
]).set_properties(**{'text-align': 'center'})
styled_df_table
Actual Values | Predicted Values | |
---|---|---|
0 | 1023.250000 | 1016.899042 |
1 | 392.050000 | 392.051720 |
2 | 550.900000 | 533.321320 |
3 | 301.100000 | 302.149611 |
4 | 362.300000 | 352.221443 |
5 | 212.900000 | 214.536149 |
6 | 264.000000 | 263.939771 |
7 | 631.750000 | 608.350294 |
8 | 967.900000 | 966.007576 |
9 | 574.700000 | 545.773854 |
import plotly.express as px
# Create the bar plot
fig = px.bar(df2.head(50), title='Support Vector Regression', barmode='group', color_discrete_sequence=px.colors.qualitative.Plotly)
# Customize the layout
fig.update_layout(
xaxis_title='Index',
yaxis_title='Values',
legend_title='Data',
width=1200,
height=600,
xaxis_tickangle=-45, # Rotate x-axis labels for better readability
showlegend=True, # Show legend
font=dict(size=12), # Set font size
plot_bgcolor='rgba(0,0,0,0)', # Set plot background color
paper_bgcolor='rgba(0,0,0,0)', # Set paper background color
bargap=0.1, # Set gap between bars
xaxis=dict(showgrid=True, gridcolor='rgba(0,0,0,0.1)'), # Show x-axis gridlines
yaxis=dict(showgrid=True, gridcolor='rgba(0,0,0,0.1)') # Show y-axis gridlines
)
# Add data labels to the bars
fig.update_traces(texttemplate='%{y}', textposition='outside')
# Display the plot
fig.show()
accuracy2 = r2_score(y_test, predict2)
print("Accuracy of Support Vector Regression:", accuracy2)
Accuracy of Support Vector Regression: 0.9799364177634605
model3 = DecisionTreeRegressor()
build3 = model3.fit(X_train.reshape(-1, 1), y_train)
predict3 = model3.predict(X_test.reshape(-1, 1))
df3 = pd.DataFrame(list(zip(y_test, predict3)), columns=["Actual Values", "Predicted Values"])
import pandas as pd
# Assuming df3 is your DataFrame
data = {'Actual Values': df3['Actual Values'], 'Predicted Values': df3['Predicted Values']}
df_table = pd.DataFrame(data)
styled_df_table = df_table.head(10).style.set_table_styles([
{'selector': 'th.row_heading', 'props': 'display: none;'}
]).set_properties(**{'text-align': 'center'})
styled_df_table
Actual Values | Predicted Values | |
---|---|---|
0 | 1023.250000 | 1022.950000 |
1 | 392.050000 | 383.900000 |
2 | 550.900000 | 528.700000 |
3 | 301.100000 | 303.883333 |
4 | 362.300000 | 348.425000 |
5 | 212.900000 | 211.000000 |
6 | 264.000000 | 264.450000 |
7 | 631.750000 | 601.550000 |
8 | 967.900000 | 966.050000 |
9 | 574.700000 | 549.300000 |
import plotly.express as px
# Create the bar plot
fig = px.bar(df3.head(50), title='Decision Tree Regression', barmode='group', color_discrete_sequence=px.colors.qualitative.Plotly)
# Customize the layout
fig.update_layout(
xaxis_title='Index',
yaxis_title='Values',
legend_title='Data',
width=1200,
height=600,
xaxis_tickangle=-45, # Rotate x-axis labels for better readability
showlegend=True, # Show legend
font=dict(size=12), # Set font size
plot_bgcolor='rgba(0,0,0,0)', # Set plot background color
paper_bgcolor='rgba(0,0,0,0)', # Set paper background color
bargap=0.1, # Set gap between bars
xaxis=dict(showgrid=True, gridcolor='rgba(0,0,0,0.1)'), # Show x-axis gridlines
yaxis=dict(showgrid=True, gridcolor='rgba(0,0,0,0.1)') # Show y-axis gridlines
)
# Add data labels to the bars
fig.update_traces(texttemplate='%{y}', textposition='outside')
# Display the plot
fig.show()
accuracy3 = r2_score(y_test, predict3)
print("Accuracy of Decision Tree Regression:", accuracy3)
Accuracy of Decision Tree Regression: 0.9973466715973613
model4 = RandomForestRegressor(n_estimators=100)
build4 = model4.fit(X_train.reshape(-1, 1), y_train)
predict4 = model4.predict(X_test.reshape(-1, 1))
df4 = pd.DataFrame(list(zip(y_test, predict4)), columns=["Actual Values", "Predicted Values"])
import pandas as pd
# Assuming df4 is your DataFrame
data = {'Actual Values': df4['Actual Values'], 'Predicted Values': df4['Predicted Values']}
df_table = pd.DataFrame(data)
styled_df_table = df_table.head(10).style.set_table_styles([
{'selector': 'th.row_heading', 'props': 'display: none;'}
]).set_properties(**{'text-align': 'center'})
styled_df_table
Actual Values | Predicted Values | |
---|---|---|
0 | 1023.250000 | 1019.395500 |
1 | 392.050000 | 392.366250 |
2 | 550.900000 | 530.443500 |
3 | 301.100000 | 303.901994 |
4 | 362.300000 | 348.924955 |
5 | 212.900000 | 211.364093 |
6 | 264.000000 | 264.753700 |
7 | 631.750000 | 603.482300 |
8 | 967.900000 | 968.403500 |
9 | 574.700000 | 550.432000 |
import plotly.express as px
# Create the bar plot
fig = px.bar(df4.head(50), title='Random Forest Regression', barmode='group', color_discrete_sequence=px.colors.qualitative.Plotly)
# Customize the layout
fig.update_layout(
xaxis_title='Index',
yaxis_title='Values',
legend_title='Data',
width=1200,
height=600,
xaxis_tickangle=-45, # Rotate x-axis labels for better readability
showlegend=True, # Show legend
font=dict(size=12), # Set font size
plot_bgcolor='rgba(0,0,0,0)', # Set plot background color
paper_bgcolor='rgba(0,0,0,0)', # Set paper background color
bargap=0.1, # Set gap between bars
xaxis=dict(showgrid=True, gridcolor='rgba(0,0,0,0.1)'), # Show x-axis gridlines
yaxis=dict(showgrid=True, gridcolor='rgba(0,0,0,0.1)') # Show y-axis gridlines
)
# Add data labels to the bars
fig.update_traces(texttemplate='%{y}', textposition='outside')
# Display the plot
fig.show()
accuracy4 = r2_score(y_test, predict4)
print("Accuracy of Random Forest Regression:", accuracy4)
Accuracy of Random Forest Regression: 0.9979437067080489
The script visualizes the accuracies of the four models using a bar chart, making it easy to compare their performance.
dict1 = {
"Model": ["Simple Linear Regression", "Support Vector Regression", "Decision Tree Regression", "Random Forest Regression"],
"Accuracy": np.array([accuracy1, accuracy2, accuracy3, accuracy4])
}
df = pd.DataFrame(dict1)
styled_df = df.style.set_table_styles([{'selector': 'tr:hover','props': [('background-color', 'yellow')]}])
styled_df
Model | Accuracy | |
---|---|---|
0 | Simple Linear Regression | 0.998493 |
1 | Support Vector Regression | 0.979936 |
2 | Decision Tree Regression | 0.997347 |
3 | Random Forest Regression | 0.997944 |
import plotly.graph_objects as go
models = ['SLR', 'SVR', 'DTR', 'RFR']
acc = [accuracy1, accuracy2, accuracy3, accuracy4]
# Create a figure
fig = go.Figure()
# Add bar trace
fig.add_trace(go.Bar(
x=models,
y=acc,
marker=dict(color=['#1f77b4', '#ff7f0e', '#2ca02c', '#d62728']), # Change bar colors
text=acc,
textposition='auto'
))
# Update layout
fig.update_layout(
title='Comparison of Accuracies of Models',
yaxis=dict(title='Accuracy'),
xaxis=dict(title='Models'),
yaxis_tickformat='.2%', # Format y-axis ticks as percentage
height=500, # Set plot height
)
# Show plot
fig.show()
html_table = future_stock_value.to_html(index=False, justify='center', classes='table table-striped table-hover table-bordered')
styled_table = f'<style>table {{border-collapse: collapse; width: 50%;}} th, td {{border: 1px solid #dddddd; text-align: left; padding: 8px;}} th {{background-color: #f2f2f2;}}</style>{html_table}'
display(HTML(styled_table))
Date | Open | Predicted |
---|---|---|
11-May-22 | 718.0 | 717.130664 |
Finally, the script predicts the closing price of a stock for a specific date using the model with the highest accuracy.
models = np.array(df['Model'])
accuracy = np.array(df['Accuracy'])
highest_accuracy=0.0
best_model=""
for i in range(len(accuracy)) :
if accuracy[i] >= highest_accuracy :
highest_accuracy=accuracy[i]
best_model=models[i]
slr, svr, dtr, rfr = [], [], [], []
if best_model == models[0] :
future_stock_value['Predicted'] = model1.predict(future_stock_value.Open.values.reshape(-1, 1))
elif best_model == models[1] :
future_stock_value['Predicted'] = model2.predict(future_stock_value.Open.values.reshape(-1, 1))
elif best_model == models[2] :
future_stock_value['Predicted'] = model3.predict(future_stock_value.Open.values.reshape(-1, 1))
elif best_model == models[3] :
future_stock_value['Predicted'] = model4.predict(future_stock_value.Open.values.reshape(-1, 1))
print(future_stock_value.to_string(index=False))
Date Open Predicted 11-May-22 718.0 717.24537
Data Visualization Open Vs Close
Decision Tree Regression
Scatter Plot and Histogram
Simple Linear Regression
Support Vector Regression
Comparison Of Accuracies Of Models
fig, ax = plt.subplots()
ax.axis('off')
props = dict(boxstyle='round', facecolor='lightblue', alpha=0.5)
ax.text(0.5, 0.5, 'THANK YOU', va='center', ha='center', fontsize=30, fontweight='bold', bbox=props)
plt.show()